


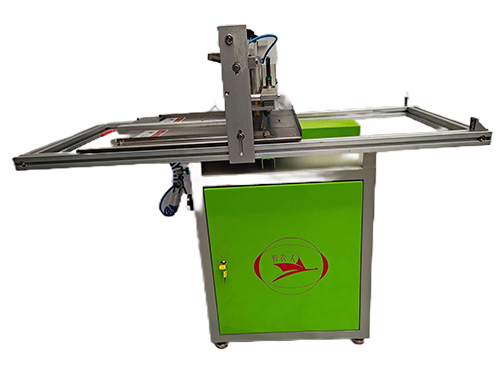
XP-200B Seeder
info@haodeseedtray.com
sales@haodeseedtray.com
【Features and Advantages】
1. The equipment uses an air pump as the power source, without other electrical equipment, and has good performance.
2. The equipment is fully automatic, highly precise, easy to use, stable in performance, simple in structure, and easy to maintain.
3. Automatically punch holes and sow seeds at the same time, suitable for standard plug trays (21 holes, 32 holes, 50 holes, 72 holes, 98 holes, 105 holes, 128 holes, 200 holes, 288 holes), etc. If it is non-standard, it can be customized according to customer requirements.
4. Adopting stepless speed regulation, good adaptability, high speed 1.1 seconds/line.
【Application】
This equipment is widely used in vegetable and flower sowing:
① Vegetables: peppers, cabbage, tomatoes, lettuce, rootstocks, etc.;
② Flowers: petunias, dianthus, cockscombs, chrysanthemums, etc.; in addition, tobacco and medicinal materials can also be used.
【Differences between XP-200A and XP-200B】
XP-200A Ordinary seed dropping tube, suitable for conventional seed dropping;
XP-200B Do not pass through the seed dropping tube, directly put the seeds in the center of the hole; For seeds of the opposite sexhave a higher advantage, such as flowers and medicinal materials.
1. Connect the air compressor to the power supply and turn on the air switch; manually rotate the oil-water separator of the equipment. When its pressure indicator shows more than 0.4Mpa, it can be used normally.

2. Put the newly selected clean and impurity-free seeds into the vibrating seeding tray and spread them evenly; adjust the vibrating seeding height so that the suction nozzle is uniformly away from the seed surface; according to the different seed types, replace different suction nozzles, the suction nozzles are φ 0.2, φ0.3, φ0.4, φ0.5, φ0.6.

3. Adjust the opening scale, loosen the M8 screws on both sides, slide the two side columns to the appropriate position, and tighten the M8 screws.

4. Adjust the suction and blowing force to the appropriate size according to the size of the seed type.

5. Place the appropriate plug tray on the stainless steel tray; push the stainless steel tray into the seeder head until it touches the travel switch.

6. Toggle the seed drill start/stop switch to start the seeding cycle.

7. Take out the plug tray to check the sowing situation and repeat steps 5-7.
8. Maintain the machine regularly, and add 32# engine oil to the refueling part.
How Modern Seedling Trays Are Powering Precision Agriculture Transformation
Precision agriculture principles are transforming seedling production with data-driven tray ...
2026-07-06
Seedling Tray Selection for Different Crop Categories: Vegetables, Flowers, and Fruits
Different crop categories—vegetables, flowers, and fruits—have distinct seedling tray r ...
2026-07-03
Understanding Root Controller Trays and Air Root Pruning Technology
Root controller trays use air root pruning technology to prevent root spiraling and promote ...
2026-06-29
Using Seed Trays for Organic Seedling Production: Compliance and Best Practices
Organic certification standards require specific practices for seedling production. Learn h ...
2026-06-26